

Table of Contents
- Step 1: Assess Your Everyday Carry Needs
- Step 2: Declutter and Remove Rarely Used Gear
- Step 3: Build Your Everyday Carry Essentials List
- Step 4: Choose a Carry System for Pockets, Pouches, and Bags
- Step 5: How to Organize an EDC Pouch Effectively
- Step 6: Optimize for Minimalist Everyday Carry
- Maintain and Test Your Setup
- Frequently Asked Questions
Last Updated: October 9, 2026
Step 1: Assess Your Everyday Carry Needs
Before you organize everyday carry, understand what you actually carry. Most people grab items without thinking about why, that's where problems start.
Spend a week tracking what you use daily. Write down each item and how often you reach for it, keys five times a day? Wallet twice? That utility knife once a week?

This audit separates essentials from wishful thinking.
Ask yourself these questions:
- What tasks do I perform most days?
- What items solve those tasks?
- Which items do I never touch?
- What would I grab in an emergency?
Most people carry 30% more than they actually need. The goal is to organize everyday carry around what you genuinely use, not what you think you should carry.
Document your findings. List every item. Note its purpose. Rate how often you use it (daily, weekly, rarely). This becomes your baseline for the next step.
Step 2: Declutter and Remove Rarely Used Gear
Now that you know what you carry, it's time to cut.
Look at your audit and find items you rated "rarely." If you haven't used something in a month, you probably don't need it in your pocket.
Remove those items, all of them.
Here's what to cut:
- Duplicate tools (two knives, two flashlights)
- Backup items you never use
- "Just in case" gear that never comes in handy
- Broken or worn items you keep meaning to fix
- Trendy tools that don't match your actual routine
Decluttering isn't about the smallest carry, it's about the right carry. A lighter load means faster access, less weight on your clothes, and less mental burden.
Store removed items at home. You can always grab them if a situation demands it. But they shouldn't live in your pockets or bag.
Step 3: Build Your Everyday Carry Essentials List
With clutter gone, build your core list.
Start with the categories most people need:
- Cutting tool, A utility knife handles boxes, cords, and small tasks
- Wallet, Cards, ID, cash
- Keys, Home, car, office
- Phone, Communication and information
- Light source, Flashlight for dark spaces
- Writing tool, Pen for notes and signatures
Not everyone needs all of these, a remote worker might skip keys, an office employee a flashlight. Build your list around your actual life.

Then add one or two items specific to your work or hobbies: a mechanic a small wrench, a parent a pocket knife, a hiker a compass.
Your list should have 8-12 items maximum. That's the sweet spot for minimalist everyday carry.
Write it down. This is your reference point for organizing everyday carry. Every item on this list earns its place. Everything else stays home.
| Category | Item | Why You Need It |
|---|---|---|
| Cutting | Utility knife | Boxes, cords, small tasks |
| Wallet | Card holder | ID, cards, cash |
| Keys | Key organizer | Access to home, car, office |
| Light | Flashlight | Dark spaces and emergencies |
| Writing | Pen | Notes and signatures |
| Tech | Phone | Communication and navigation |
Step 4: Choose a Carry System for Pockets, Pouches, and Bags
Now you decide where everything lives. This is where organization actually happens.
You have three main options:
Pocket carry works for 4-6 items. Distribute them across front and back pockets: a slim wallet, a utility knife clipped to your pocket, keys in one pocket, phone in another.

Pouch carry works for 7-12 items. An organizer pouch attached to your belt or bag keeps small gear contained and accessible.
Bag carry works for 12+ items or if you move between locations. Use a backpack or messenger bag with compartments, organized by category.
Most people mix all three: phone in a front pocket, wallet and keys in a pouch, backup gear in a bag at your desk.
The key is consistency. Once you choose your system, stick with it. Your brain learns where things are. You find them without thinking.
Step 5: How to Organize an EDC Pouch Effectively
If you're using a pouch, this step matters most. The difference between a pouch that works and one that becomes a junk drawer comes down to three decisions: pouch size, zone layout, and a repeatable test.
Match pouch size to item count, not ambition. A common pattern is roughly one liter of pouch volume per four to six small items. Too much empty space and items shift and rattle; if it bulges when zipped, the layout will fail in a week.
RAW V2 (Rapid Access Wallet) →
Build zones by retrieval speed, not category. Most people sort by type (tools here, wallet there), but a better method is sorting by how fast you need to reach each item:
- Zone 1, instant access (front or top pocket): items you touch multiple times a day. Phone, primary payment card, keys, or the tool you reach for most.
- Zone 2, quick access (main compartment, top layer): items you use most days but not constantly. Pen, flashlight, secondary card.
- Zone 3, deliberate access (main compartment, bottom layer or rear pocket): items you use weekly. Backup battery, small first-aid items, spare cash.
- Zone 4, contingency (rear or secondary pouch): items you hope not to need. Emergency contact card, a spare key, a small tool you carry for rare tasks.
Layering matters as much as zoning.
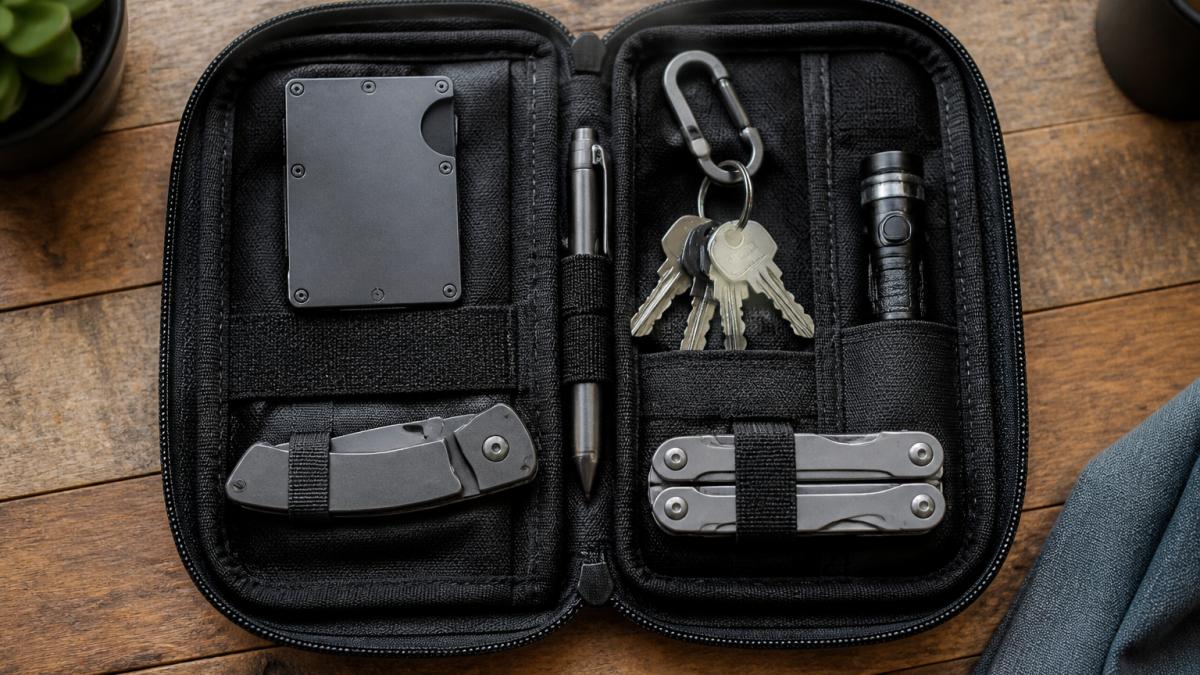
Use sub-pouches and elastic loops instead of loose dividers. Soft dividers collapse when compressed; elastic loops and small zippered sub-pouches hold their shape.
Run a three-test audit before you commit. This step separates a pouch that lasts from one you abandon:
- The dark test. Close your eyes, open the pouch, and retrieve your wallet, then your keys, then your primary tool. If you can't do all three in under about fifteen seconds without looking, your zones are wrong. Move the slow items forward or consolidate them.
- The shake test. Zip the pouch, shake it firmly for five seconds, and open it. If anything has moved out of its zone, add a loop, a sub-pouch, or a retention strap. Loose items are lost items.
- The one-week log. For seven days, note every time you open the pouch and what you reached for. At the end of the week, anything you never touched moves back a zone or out of the pouch entirely. Anything you reached for more than three times a day moves forward.
Re-test after any change. Every time you add or remove an item, rerun the dark and shake tests.
A well-organized pouch isn't the one with the most compartments. It's the one where your hand knows where to go before your eyes do. That only happens when the layout is tested, not just imagined.
Step 6: Optimize for Minimalist Everyday Carry
Minimalist everyday carry means carrying less, not nothing, maximum utility with minimum weight.
Here's how to optimize:
Choose multi-tools. A utility knife with a bottle opener saves space; a wallet holding cards and cash in one slim unit beats two separate items.
Ditch duplicates. One good knife beats two mediocre ones. One quality flashlight beats a backup flashlight you never use.
Pick lightweight materials. Titanium weighs less than steel. Aluminum weighs less than brass. Weight matters when you carry something all day.
Use modular gear. A pouch system lets you swap items by day, wallet for work, compass for hiking, so one setup adapts to many situations.
Embrace empty pockets. You don't need to fill every pocket. Empty space means comfort. It means freedom to add items when you need them.
Minimalist everyday carry isn't about the smallest load, it's about the right load. Every item earns its weight.
Maintain and Test Your Setup
Your setup isn't permanent, life changes, needs change, gear wears out. The difference between a setup that stays sharp for years and one that quietly degrades is a maintenance schedule and a testing habit.
Run a 30-day trial, then a quarterly audit. After any significant change, give it thirty days before judging, a new pouch or removed item feels wrong the first week simply because it's unfamiliar. At day thirty, ask three questions:
- Did I reach for anything that wasn't there?
- Did I carry anything I never touched?
- Did anything fail, jam, or run out?
Repeat the same three questions every quarter. Thirty days catches layout problems; ninety days catches seasonal and routine changes (a commute shift, a new job, a new hobby) a monthly glance would miss.
Maintenance schedule by item type. Different items fail on different clocks. A simple schedule:
| Item | Check | Replace or service |
|---|---|---|
| Flashlight / headlamp | Monthly | Recharge or swap batteries; replace cells every 6-12 months depending on use |
| Backup battery pack | Monthly | Recharge to roughly half if unused; replace when it no longer holds a full charge |
| First-aid supplies | Quarterly | Replace anything past its expiration date; restock used items immediately |
| Utility knife blade | Monthly, or after heavy use | Swap the blade when it tears rather than slices; check the lock and pivot for play |
| Multi-tool | Quarterly | Wipe, apply a drop of light oil to pivots, check for rust or loose screws |
| Keys and key organizer | Quarterly | Check for bent or worn keys, loose screws, and stretched elastic or clips |
| Wallet | Quarterly | Check card slots for stretching, stitching for fraying, and RFID-blocking layers for wear |
| Pen | Quarterly | Test the ink; replace the refill before it fails mid-task |
Replace tools on condition, not a calendar. A utility knife blade, pen refill, or elastic loop should be replaced when it stops performing.
Test in context, not just at your desk. A setup that works at a desk can fail on a hike, in a car, or on a trip.
Keep a small spares kit at home. A drawer with spare blades, a battery, a pen refill, and first-aid refills lets you service your carry in minutes instead of ordering and waiting, turning a broken item from a week-long problem into a two-minute fix.
A utility knife like the RUK V3 from Gil-Tek shows this principle. It's designed for real use: the blade extends and retracts smoothly, the bottle opener works, and the pry bar handles light duty tasks.
Keep your setup fresh. The best everyday carry is the one you actually use, and maintain.
Frequently Asked Questions
What items should I include in my everyday carry essentials?
Start with what you actually use daily: wallet, keys, phone, and a compact utility tool. Add items based on your routine, if you open packages frequently, include a utility knife like the RUK V3. Review your everyday carry checklist monthly and remove anything unused for two weeks. Your essentials will shift with seasons and lifestyle changes, so stay flexible.
How do I decide what belongs in my everyday carry?
Track what you reach for over one week. Write down every item you use. If something doesn't appear on that list, remove it. For minimalist everyday carry, aim for 5-10 core items maximum. Test each addition for two weeks before making it permanent. This audit-and-test approach ensures your carry system matches real needs, not assumed ones.
How often should I review my everyday carry setup?
Review your setup monthly or whenever your routine changes. Seasonal shifts (work transitions, travel frequency, weather) will affect what you need. When you add a new item, remove something else to maintain your target weight and bulk. Regular maintenance keeps your everyday carry essentials relevant and prevents clutter from creeping back in.
How can I keep everyday carry compact and easy to access?
Use a dedicated carry system, pockets, an EDC pouch, or a small bag, and assign each item a specific location. Group similar items (cards and ID in a slim wallet like the RAW V2, small tools in one pouch). Keep your most-used items in the easiest-to-reach spot. Minimize packaging and choose tools designed for pocket carry, like the compact RUK-S utility knife that fits unnoticed in a shirt pocket.
0 comments